Abstract
In the sheet metal fabrication industry, the term ‘gauge’ is used to specify the thickness or size of sheet metals. If you are unfamiliar with the sheet metal industry or gauge system, you would be confused by the phrase ‘18 gauge steel’. This blog will help you out! This blog will explicitly introduce the gauge system, and sheet metal gauge chart features.
Sheet Metal Gauge Charts
The sheet metal gauge(thickness) conversion chart varies for different metals. This article will introduce you the steel gauge thickness chart. Three commonly used metal gauge charts are listed below: Standard Steel, Galvanized Steel, and Aluminum gauge charts.
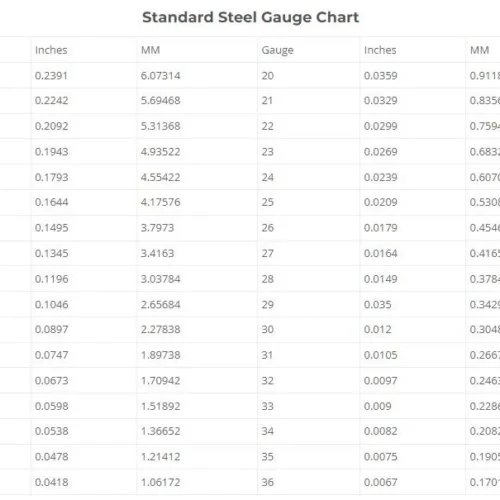
Standard Steel Gauge Chart
| Gauge | Inches | MM | Gauge | Inches | MM |
| 3 | 0.2391 | 6.07314 | 20 | 0.0359 | 0.91186 |
| 4 | 0.2242 | 5.69468 | 21 | 0.0329 | 0.83566 |
| 5 | 0.2092 | 5.31368 | 22 | 0.0299 | 0.75946 |
| 6 | 0.1943 | 4.93522 | 23 | 0.0269 | 0.68326 |
| 7 | 0.1793 | 4.55422 | 24 | 0.0239 | 0.60706 |
| 8 | 0.1644 | 4.17576 | 25 | 0.0209 | 0.53086 |
| 9 | 0.1495 | 3.7973 | 26 | 0.0179 | 0.45466 |
| 10 | 0.1345 | 3.4163 | 27 | 0.0164 | 0.41656 |
| 11 | 0.1196 | 3.03784 | 28 | 0.0149 | 0.37846 |
| 12 | 0.1046 | 2.65684 | 29 | 0.035 | 0.3429 |
| 13 | 0.0897 | 2.27838 | 30 | 0.012 | 0.3048 |
| 14 | 0.0747 | 1.89738 | 31 | 0.0105 | 0.2667 |
| 15 | 0.0673 | 1.70942 | 32 | 0.0097 | 0.24638 |
| 16 | 0.0598 | 1.51892 | 33 | 0.009 | 0.2286 |
| 17 | 0.0538 | 1.36652 | 34 | 0.0082 | 0.20828 |
| 18 | 0.0478 | 1.21412 | 35 | 0.0075 | 0.1905 |
| 19 | 0.0418 | 1.06172 | 36 | 0.0067 | 0.17018 |
Strandard steel gauge thickness chart
Galvanized Steel Gauge Chart
| Gauge | Inches | MM | Gauge | Inches | MM |
| 3 | – | – | 20 | 0.0396 | 1.00584 |
| 4 | – | – | 21 | 0.0366 | 0.92964 |
| 5 | – | – | 22 | 0.0336 | 0.85344 |
| 6 | – | – | 23 | 0.0306 | 0.77724 |
| 7 | – | – | 24 | 0.0276 | 0.7004 |
| 8 | – | – | 25 | 0.0247 | 0.62738 |
| 9 | 0.1532 | 3.89128 | 26 | 0.0217 | 0.55118 |
| 10 | 0.1382 | 3.51028 | 27 | 0.0202 | 0.51308 |
| 11 | 0.1233 | 3.13182 | 28 | 0.0187 | 0.47498 |
| 12 | 0.1084 | 2.75336 | 29 | 0.0172 | 0.43688 |
| 13 | 0.0934 | 2.37236 | 30 | 0.0157 | 0.39878 |
| 14 | 0.0785 | 1.9939 | 31 | 0.0142 | 0.36068 |
| 15 | 0.071 | 1.8034 | 32 | 0.0134 | 0.34036 |
| 16 | 0.0635 | 1.6129 | 33 | – | – |
| 17 | 0.0575 | 1.4605 | 34 | – | – |
| 18 | 0.0516 | 1.31064 | 35 | – | – |
| 19 | 0.0456 | 1.15824 | 36 | – | – |
Galvanized steel gauge thickness chart
Aluminum Gauge Chart
| Gauge | Inches | MM | Gauge | Inches | MM |
| 3 | 0.2294 | 5.82676 | 20 | 0.032 | 0.8128 |
| 4 | 0.2043 | 5.18922 | 21 | 0.0285 | 0.7239 |
| 5 | 0.1819 | 4.62026 | 22 | 0.0253 | 0.64262 |
| 6 | 0.162 | 4.1148 | 23 | 0.0226 | 0.57404 |
| 7 | 0.1443 | 3.66522 | 24 | 0.0201 | 0.51054 |
| 8 | 0.1285 | 3.2639 | 25 | 0.0179 | 0.45466 |
| 9 | 0.1144 | 2.90576 | 26 | 0.0159 | 0.40386 |
| 10 | 0.1019 | 2.58826 | 27 | 0.0142 | 0.36068 |
| 11 | 0.0907 | 2.30378 | 28 | 0.0126 | 0.32004 |
| 12 | 0.0808 | 2.05232 | 29 | 0.0113 | 0.28702 |
| 13 | 0.072 | 1.8288 | 30 | 0.01 | 0.254 |
| 14 | 0.0641 | 1.62814 | 31 | 0.0089 | 0.22606 |
| 15 | 0.0571 | 1.45034 | 32 | 0.008 | 0.2032 |
| 16 | 0.0508 | 1.29032 | 33 | 0.0071 | 0.18034 |
| 17 | 0.0453 | 1.15062 | 34 | 0.0063 | 0.16002 |
| 18 | 0.0403 | 1.02362 | 35 | 0.0056 | 0.14224 |
| 19 | 0.0359 | 0.91186 | 36 | – | – |
Aluminum metal gauge chart
Click here to view and download sheet metal gauge chart pdf.
History of Sheet Metal Gauge
The word ‘gauge’ linguistically originated from the French word ‘jauge,’ meaning ‘capacity that a specific container must have.’ The name of the gauge suggests that it’s related to the steel, iron, and wire-drawing industries. This practice has been around for hundreds of years. Archaeological evidence indicates that it existed in the ancient past.
Traditional thickness measurements use gauges. British iron wire industry first used this word when there was no standard thickness measurement. The wire-drawing procedure and the properties of iron as a material determined the gauge number sizes. In the 19th century, the measurement and description of gauges were the fractions of an inch. One gauge was legalized and made to be the Standard Wire Gauge in the UK. The convenience of craftspeople was a crucial factor in the gauge’s standardization. With the birth of the International System of Units in the 20th century, the gauge was to be replaced.
How to Use Sheet Metal Gauge
The gauge number is inversely proportional to the thickness of the sheet metal. The smaller the gauge number is, the greater the thickness. The gauge numbers and the measured inches and millimeters are independent of different sheet metals. For example, gauge number 9 for standard steel and aluminum are 0.1495 in and 0.1144 in, respectively.
Gauges are employed to specify a sheet metal’s thickness. The values of gauges are not dependent on either the metric or the standard measuring systems. The actual thickness of sheet metal may be calculated in inches or millimeters using a gauge conversion chart. According to a gauge conversion chart, 10 gauge standard steel, for instance, equals 0.1345 inches or 3.4163 millimeters. The gauge number “10” has no bearing on the measures themselves.
Various gauge systems are in use now, with certain gauge designations being applied to particular metal kinds. For instance, under the same gauge system, 10 gauge standard steel has a thickness of 0.1345 inches while 10 gauge aluminum has a thickness of 0.1019 inches.
Final words
The three charts above give you the conversions from gauge to inches and millimeters for steel, galvanized steel, and aluminum. If you still need clarification about the gauge(thickness) conversion charts, or you inquire about any other sheet metal type, please feel free to contact us. You are more than welcome to have our professional technical support!


